The Kredka (talk | contribs) m (→Trainers) Tag: rte-wysiwyg |
Jackster3000 (talk | contribs) No edit summary |
||
| (19 intermediate revisions by 7 users not shown) | |||
| Line 6: | Line 6: | ||
|north = Forest Gate |
|north = Forest Gate |
||
|south = Tan Boat Creek |
|south = Tan Boat Creek |
||
| + | |map = Rijon-Botan-City.gif}} |
||
| − | |map = Rijon-Botan-City.gif}}'''Botan City '''is a city in the region of [[Rijon]]. It doesn't have a Pokémon Center, because its people see Pokémon Centers as unnatural.</span> |
||
| + | '''Botan City '''is a city in the region of [[Rijon]]. It doesn't have a Pokémon Center, because its people see Pokémon Centers as unnatural. It has a secret Pokémon Center in Pokemon Prism, however. |
||
| Line 13: | Line 14: | ||
{{Itemlist|Lucky Punch|in the house with Chansey inside|RijonAdv = yes}} |
{{Itemlist|Lucky Punch|in the house with Chansey inside|RijonAdv = yes}} |
||
{{Itemlist|PokéFlute|given by Evelyn|RijonAdv = yes}} |
{{Itemlist|PokéFlute|given by Evelyn|RijonAdv = yes}} |
||
| + | {{Itemlist|Mystic Water|nearby the bridge (requires Surf)|RijonAdv = yes}} |
||
| + | {{Itemlist|PP Max|given by Joe Reed after saving Carmella|RijonAdv = yes}} |
||
{{Itlistfoot}} |
{{Itlistfoot}} |
||
==PokéMart== |
==PokéMart== |
||
| + | {{shop|Rijon Adventures}} |
||
| − | {| class="roundy" align="left" style="border: 2px solid #3c4047; background: #3c4047; font-size:12px; margin-right: 5px; margin-bottom: 5px;" |
||
| + | {{shoprow|{{shopitem|Poké Ball|200}}|{{shopitem|Great Ball|600}}}} |
||
| − | !colspan="2" align=center style="background:#3c4047; color:black;" |<span style="color:white;font-size:14px;">Rijon Adventures</span> |
||
| + | {{shoprow|{{shopitem|Potion|300}}|{{shopitem|Super Potion|700}}}} |
||
| − | |- |
||
| + | {{shoprow|{{shopitem|Hyper Potion|1200}}|{{shopitem|Antidote|100}}}} |
||
| − | !align=center style="background:#d0d2d7; color:black; border-top-left-radius:0.3em;" | Item |
||
| + | {{shoprow|{{shopitem|Parlyz Heal|200}}|{{shopitem|Awakening|250}}}} |
||
| − | ! align="center" style="background:#d0d2d7;border-top-right-radius:0.3em;" | Price |
||
| + | {{shoprow|{{shopitem|Ice Heal|250}}|{{shopitem|Escape Rope|550}}}} |
||
| − | |- |
||
| + | {{shoprow|{{shopitem|Repel|350}}|{{shopitem|Super Repel|500}}}} |
||
| − | |align="center" style="background:white;" | Poké Ball |
||
| − | |align="center" style="background:white;" | {{Pdollar}}200 |
||
| − | |- |
||
| − | |align="center" style="background:white;" | Great Ball |
||
| − | |align="center" style="background:white;" | {{Pdollar}}600 |
||
| − | |- |
||
| − | |align="center" style="background:white;" | Potion |
||
| − | |align="center" style="background:white;" | {{Pdollar}}300 |
||
| − | |- |
||
| − | |align="center" style="background:white;" | Super Potion |
||
| − | |align="center" style="background:white;" | {{Pdollar}}700 |
||
| − | |- |
||
| − | |align="center" style="background:white;" | Hyper Potion |
||
| − | |align="center" style="background:white;" | {{Pdollar}}1200 |
||
| − | |- |
||
| − | |align="center" style="background:white;" | Antidote |
||
| − | |align="center" style="background:white;" | {{Pdollar}}100 |
||
| − | |- |
||
| − | |align="center" style="background:white;" | Parlyz Heal |
||
| − | |align="center" style="background:white;" | {{Pdollar}}200 |
||
| − | |- |
||
| − | |align="center" style="background:white;" | Awakening |
||
| − | |align="center" style="background:white;" | {{Pdollar}}250 |
||
| − | |- |
||
| − | |align="center" style="background:white;" | Ice Heal |
||
| − | |align="center" style="background:white;" | {{Pdollar}}250 |
||
| − | |- |
||
| − | |align="center" style="background:white;" | Escape Rope |
||
| − | |align="center" style="background:white;" | {{Pdollar}}550 |
||
| − | |- |
||
| − | |align="center" style="background:white;" | Repel |
||
| − | |align="center" style="background:white;" | {{Pdollar}}350 |
||
| − | |- |
||
| − | |align="center" style="background:white;" | Super Repel |
||
| − | |align="center" style="background:white;" | {{Pdollar}}500 |
||
|- |
|- |
||
!colspan="2" align=center style="background:#3c4047; color:black;" | |
!colspan="2" align=center style="background:#3c4047; color:black;" | |
||
| + | {{shoprow|{{shopitem|Dream Mail|50}}|{{shopitem|Shadow Mail|50}}}} |
||
| − | |- |
||
| + | {{shoprow|{{shopitem|Net Ball|1000}}|{{shopitem|Repeat Ball|1000}}}} |
||
| − | |align="center" style="background:white;" |Dream Mail |
||
| + | {{shopfooter|multiple=yes}} |
||
| − | |align="center" style="background:white;" |{{Pdollar}}50 |
||
| − | |- |
||
| − | |align="center" style="background:white;" | Shadow Mail |
||
| − | |align="center" style="background:white;" | {{Pdollar}}50 |
||
| − | |- |
||
| − | |align="center" style="background:white;" |Net Ball |
||
| − | |align="center" style="background:white;" | {{Pdollar}}1000 |
||
| − | |- |
||
| − | |align="center" style="background:white;" |Repeat Ball |
||
| − | |align="center" style="background:white;" | {{Pdollar}}1000 |
||
| − | |- |
||
| − | !colspan="3" align=center style="background:#d0d2d7;padding:3px; vertical-align:top; border-bottom-left-radius:0.3em; border-bottom-right-radius:0.3em; color:black;"| |
||
| − | |} |
||
| − | {{-}} |
||
==Trainers== |
==Trainers== |
||
| + | <br> |
||
| − | If the Player picked Charmander: |
||
| + | [[File:Charmander-icon.png]] If the Player chose '''Charmander''': |
||
| − | {| class="mw-collapsible mw-collapsed wikitable" style="background:#9c9fa5; border: 2px solid #3c4047;-moz-border-radius:7.5px; -webkit-border-radius: 7.5px;" width="50%" |
||
| + | {{Party/Header |
||
| − | |- style="border-bottom: 2px solid #3c4047;" |
||
| + | |Sprite=RijonAdv-Rival.png |
||
| − | |colspan="2" align=center style="background:#9c9fa5; color:black;" | '''<big>Rival</big>'''<br />[[Botan City]]<br /><small>Reward:[[File:PokémonDollar.png]] 288</small> |
||
| + | |Class= |
||
| − | |colspan="1" align=center style="background:#9c9fa5; color:black;" | [[File:Rijon Rival.png | 26px]] |
||
| + | |Name=Rival |
||
| − | |colspan="1" align=center style="background:#9c9fa5; color:black;" | |
||
| + | |Location=Botan City |
||
| − | |- |
||
| + | |Prize=900 |
||
| − | |colspan="2" align=center style="background:#d0d2d7; color:black; border-right: 2px solid #3c4047;" | '''Pidgeotto''' |
||
| + | |Pokemon=5}} |
||
| − | <small>Lvl 25</small> |
||
| + | {{Party/Pokemon2 |
||
| − | |colspan="2" align=center style="background:#d0d2d7; color:black;" | '''Wartortle''' |
||
| + | |Pokemon 1 Image = [[File:Pidgeotto-icon.png]] |
||
| − | <small>Lvl 25</small> |
||
| + | |Pokemon 1 Name = Pidgeotto |
||
| − | |- |
||
| + | |Pokemon 1 Level = 25 |
||
| − | |colspan="1" align=center style="background:white; color:black;" | Tackle |
||
| + | |Pokemon 1 Move 1 = Tackle |
||
| − | |colspan="1" align=center style="background:white; color:black; border-right: 2px solid #3c4047;" | Sand-Atttack |
||
| + | |Pokemon 1 Move 2 = Sand-Attack |
||
| − | |colspan="1" align=center style="background:white; color:black;" | Tail Whip |
||
| + | |Pokemon 1 Move 3 = Gust |
||
| − | |colspan="1" align=center style="background:white; color:black;" | Tackle |
||
| + | |Pokemon 1 Move 4 = Quick Attack |
||
| − | |- |
||
| + | |Pokemon 2 Image = [[File:Wartortle-icon.png]] |
||
| − | |colspan="1" align=center style="background:white; color:black;" | Gust |
||
| + | |Pokemon 2 Name = Wartortle |
||
| − | |colspan="1" align=center style="background:white; color:black; border-right: 2px solid #3c4047;" | Quick Attack |
||
| + | |Pokemon 2 Level = 25 |
||
| − | |colspan="1" align=center style="background:white; color:black;" | Water Gun |
||
| + | |Pokemon 2 Move 1 = Tail Whip |
||
| − | |colspan="1" align=center style="background:white; color:black;" | Withdraw |
||
| + | |Pokemon 2 Move 2 = Tackle |
||
| − | |- |
||
| + | |Pokemon 2 Move 3 = Water Gun |
||
| − | |colspan="2" align=center style="background:#d0d2d7; color:black; border-right: 2px solid #3c4047; border-top: 2px solid #3c4047;" | '''Kadabra''' |
||
| + | |Pokemon 2 Move 4 = Withdraw}} |
||
| − | <small>Lvl 20</small> |
||
| + | {{Party/Pokemon2 |
||
| − | |colspan="2" align=center style="background:#d0d2d7; color:black; border-top: 2px solid #3c4047;" | '''Exeggcute''' |
||
| + | |Pokemon 1 Image = [[File:Kadabra-icon.png]] |
||
| − | <small>Lvl 16</small> |
||
| + | |Pokemon 1 Name = Kadabra |
||
| − | |- |
||
| + | |Pokemon 1 Level = 20 |
||
| − | |colspan="1" align=center style="background:white; color:black;" | Disable |
||
| + | |Pokemon 1 Move 1 = Disable |
||
| − | |colspan="1" align=center style="background:white; color:black; border-right: 2px solid #3c4047;" | Confusion |
||
| + | |Pokemon 1 Move 2 = Confusion |
||
| − | |colspan="1" align=center style="background:white; color:black;" | Leech Seed |
||
| + | |Pokemon 1 Move 3 = -- |
||
| − | |colspan="1" align=center style="background:white; color:black;" | Confusion |
||
| + | |Pokemon 1 Move 4 = Kinesis |
||
| − | |- |
||
| + | |Pokemon 2 Image = [[File:Exeggcute-icon.png]] |
||
| − | |colspan="1" align=center style="background:white; color:black;" | -- |
||
| + | |Pokemon 2 Name = Exeggcute |
||
| − | |colspan="1" align=center style="background:white; color:black; border-right: 2px solid #3c4047;" | Kinsesis |
||
| + | |Pokemon 2 Level = 20 |
||
| − | |colspan="1" align=center style="background:white; color:black;" | Uproar |
||
| + | |Pokemon 2 Move 1 = Leech Seed |
||
| − | |colspan="1" align=center style="background:white; color:black;" | -- |
||
| + | |Pokemon 2 Move 2 = Confusion |
||
| − | |- |
||
| + | |Pokemon 2 Move 3 = Uproar |
||
| − | |colspan="2" align=center style="background:#d0d2d7; color:black; border-right: 2px solid #3c4047; border-top: 2px solid #3c4047;" | '''Growlithe''' |
||
| + | |Pokemon 2 Move 4 = --}} |
||
| − | <small>Lvl 23</small> |
||
| + | {{Party/Pokemon4 |
||
| − | |colspan="2" align=center style="background:#d0d2d7; color:black; border-top: 2px solid #3c4047;" | |
||
| + | |Pokemon 1 Image = [[File:Growlithe-icon.png]] |
||
| − | |- |
||
| + | |Pokemon 1 Name = Growlithe |
||
| − | |colspan="1" align=center style="background:white; color:black;" | Tackle |
||
| + | |Pokemon 1 Level = 23 |
||
| − | |colspan="1" align=center style="background:white; color:black; border-right: 2px solid #3c4047;" | Tail Whip |
||
| + | |Pokemon 1 Move 1 = Ember |
||
| − | |colspan="1" align=center style="background:white; color:black;" | |
||
| + | |Pokemon 1 Move 2 = Leer |
||
| − | |colspan="1" align=center style="background:white; color:black;" | |
||
| + | |Pokemon 1 Move 3 = Odor Sleuth |
||
| − | |- |
||
| + | |Pokemon 1 Move 4 = --}} |
||
| − | |colspan="1" align=center style="background:white; color:black;" | -- |
||
| − | |colspan="1" align=center style="background:white; color:black; border-right: 2px solid #3c4047;" | Quick Attack |
||
| − | |colspan="1" align=center style="background:white; color:black;" | |
||
| − | |colspan="1" align=center style="background:white; color:black;" | |
||
|} |
|} |
||
| + | {{-}} |
||
| − | |||
| − | If the Player |
+ | [[File:Squirtle-icon.png]] If the Player chose '''Squirtle''': |
| + | {{Party/Header |
||
| − | {| class="mw-collapsible mw-collapsed wikitable" style="background:#9c9fa5; border: 2px solid #3c4047;-moz-border-radius:7.5px; -webkit-border-radius: 7.5px;" width="50%" |
||
| + | |Sprite=RijonAdv-Rival.png |
||
| − | |- style="border-bottom: 2px solid #3c4047;" |
||
| + | |Class= |
||
| − | |colspan="2" align=center style="background:#9c9fa5; color:black;" | '''<big>Rival</big>'''<br />[[Botan City]]<br /><small>Reward:[[File:PokémonDollar.png]] 288</small> |
||
| + | |Name=Rival |
||
| − | |colspan="1" align=center style="background:#9c9fa5; color:black;" | [[File:Rijon Rival.png | 26px]] |
||
| + | |Location=Botan City |
||
| − | |colspan="1" align=center style="background:#9c9fa5; color:black;" | |
||
| + | |Prize=900 |
||
| − | |- |
||
| + | |Pokemon=5}} |
||
| − | |colspan="2" align=center style="background:#d0d2d7; color:black; border-right: 2px solid #3c4047;" | '''Pidgeotto''' |
||
| + | {{Party/Pokemon2 |
||
| − | <small>Lvl 25</small> |
||
| + | |Pokemon 1 Image = [[File:Pidgeotto-icon.png]] |
||
| − | |colspan="2" align=center style="background:#d0d2d7; color:black;" | '''Ivysaur''' |
||
| + | |Pokemon 1 Name = Pidgeotto |
||
| − | <small>Lvl 25</small> |
||
| + | |Pokemon 1 Level = 25 |
||
| − | |- |
||
| + | |Pokemon 1 Move 1 = Tackle |
||
| − | |colspan="1" align=center style="background:white; color:black;" | Tackle |
||
| + | |Pokemon 1 Move 2 = Sand-Attack |
||
| − | |colspan="1" align=center style="background:white; color:black; border-right: 2px solid #3c4047;" | Sand-Atttack |
||
| + | |Pokemon 1 Move 3 = Gust |
||
| − | |colspan="1" align=center style="background:white; color:black;" | Sleep Powder |
||
| + | |Pokemon 1 Move 4 = Quick Attack |
||
| − | |colspan="1" align=center style="background:white; color:black;" | Poison Powder |
||
| + | |Pokemon 2 Image = [[File:Ivysaur-icon.png]] |
||
| − | |- |
||
| + | |Pokemon 2 Name = Ivysaur |
||
| − | |colspan="1" align=center style="background:white; color:black;" | Gust |
||
| + | |Pokemon 2 Level = 25 |
||
| − | |colspan="1" align=center style="background:white; color:black; border-right: 2px solid #3c4047;" | Quick Attack |
||
| + | |Pokemon 2 Move 1 = Sleep Powder |
||
| − | |colspan="1" align=center style="background:white; color:black;" | Vine Whip |
||
| + | |Pokemon 2 Move 2 = Poison Powder |
||
| − | |colspan="1" align=center style="background:white; color:black;" | Leech Seed |
||
| + | |Pokemon 2 Move 3 = Vine Whip |
||
| − | |- |
||
| + | |Pokemon 2 Move 4 = Leech Seed}} |
||
| − | |colspan="2" align=center style="background:#d0d2d7; color:black; border-right: 2px solid #3c4047; border-top: 2px solid #3c4047;" | '''Kadabra''' |
||
| + | {{Party/Pokemon2 |
||
| − | <small>Lvl 20</small> |
||
| + | |Pokemon 1 Image = [[File:Kadabra-icon.png]] |
||
| − | |colspan="2" align=center style="background:#d0d2d7; color:black; border-top: 2px solid #3c4047;" | '''Growlithe''' |
||
| + | |Pokemon 1 Name = Kadabra |
||
| − | <small>Lvl 22</small> |
||
| + | |Pokemon 1 Level = 20 |
||
| − | |- |
||
| + | |Pokemon 1 Move 1 = Disable |
||
| − | |colspan="1" align=center style="background:white; color:black;" | Disable |
||
| + | |Pokemon 1 Move 2 = Confusion |
||
| − | |colspan="1" align=center style="background:white; color:black; border-right: 2px solid #3c4047;" | Confusion |
||
| + | |Pokemon 1 Move 3 = -- |
||
| − | |colspan="1" align=center style="background:white; color:black;" | Tail Whip |
||
| + | |Pokemon 1 Move 4 = Kinesis |
||
| − | |colspan="1" align=center style="background:white; color:black;" | Tackle |
||
| + | |Pokemon 2 Image = [[File:Growlithe-icon.png]] |
||
| − | |- |
||
| + | |Pokemon 2 Name = Growlithe |
||
| − | |colspan="1" align=center style="background:white; color:black;" | -- |
||
| + | |Pokemon 2 Level = 23 |
||
| − | |colspan="1" align=center style="background:white; color:black; border-right: 2px solid #3c4047;" | Kinesis |
||
| + | |Pokemon 2 Move 1 = Ember |
||
| − | |colspan="1" align=center style="background:white; color:black;" | Quick Attack |
||
| + | |Pokemon 2 Move 2 = Leer |
||
| − | |colspan="1" align=center style="background:white; color:black;" | -- |
||
| + | |Pokemon 2 Move 3 = Odor Sleuth |
||
| − | |- |
||
| + | |Pokemon 2 Move 4 = --}} |
||
| − | |colspan="2" align=center style="background:#d0d2d7; color:black; border-right: 2px solid #3c4047; border-top: 2px solid #3c4047;" | |
||
| + | {{Party/Pokemon4 |
||
| − | Gyarados |
||
| + | |Pokemon 1 Image = [[File:Gyarados-icon.png]] |
||
| − | |||
| + | |Pokemon 1 Name = Gyarados |
||
| − | <small>Lvl 23</small> |
||
| + | |Pokemon 1 Level = 23 |
||
| − | |colspan="2" align=center style="background:#d0d2d7; color:black; border-top: 2px solid #3c4047;" | |
||
| + | |Pokemon 1 Move 1 = |
||
| − | |- |
||
| + | |Pokemon 1 Move 2 = Thrash |
||
| − | |colspan="1" align=center style="background:white; color:black;" | |
||
| + | |Pokemon 1 Move 3 = |
||
| − | |colspan="1" align=center style="background:white; color:black; border-right: 2px solid #3c4047;" | Thrash |
||
| + | |Pokemon 1 Move 4 = }} |
||
| − | |colspan="1" align=center style="background:white; color:black;" | |
||
| − | |colspan="1" align=center style="background:white; color:black;" | |
||
| − | |- |
||
| − | |colspan="1" align=center style="background:white; color:black;" | |
||
| − | |colspan="1" align=center style="background:white; color:black; border-right: 2px solid #3c4047;" | |
||
| − | |colspan="1" align=center style="background:white; color:black;" | |
||
| − | |colspan="1" align=center style="background:white; color:black;" | |
||
|} |
|} |
||
| + | {{-}} |
||
| − | |||
| − | If the Player |
+ | [[File:Bulbasaur-icon.png]] If the Player chose '''Bulbasaur''': |
| + | {{Party/Header |
||
| − | {| class="mw-collapsible mw-collapsed wikitable" style="background:#9c9fa5; border: 2px solid #3c4047;-moz-border-radius:7.5px; -webkit-border-radius: 7.5px;" width="50%" |
||
| + | |Sprite=RijonAdv-Rival.png |
||
| − | |- style="border-bottom: 2px solid #3c4047;" |
||
| + | |Class= |
||
| − | |colspan="2" align=center style="background:#9c9fa5; color:black;" | '''<big>Rival</big>'''<br />[[Botan City]]<br /><small>Reward:[[File:PokémonDollar.png]] 900</small> |
||
| + | |Name=Rival |
||
| − | |colspan="1" align=center style="background:#9c9fa5; color:black;" | [[File:Rijon Rival.png | 26px]] |
||
| + | |Location=Botan City |
||
| − | |colspan="1" align=center style="background:#9c9fa5; color:black;" | |
||
| + | |Prize=900 |
||
| − | |- |
||
| + | |Pokemon=5}} |
||
| − | |colspan="2" align=center style="background:#d0d2d7; color:black; border-right: 2px solid #3c4047;" | '''Pidgeotto''' |
||
| + | {{Party/Pokemon2 |
||
| − | <small>Lvl 25</small> |
||
| + | |Pokemon 1 Image = [[File:Pidgeotto-icon.png]] |
||
| − | |colspan="2" align=center style="background:#d0d2d7; color:black;" | '''Gyarados''' |
||
| + | |Pokemon 1 Name = Pidgeotto |
||
| − | <small>Lvl 22</small> |
||
| + | |Pokemon 1 Level = 25 |
||
| − | |- |
||
| + | |Pokemon 1 Move 1 = Tackle |
||
| − | |colspan="1" align=center style="background:white; color:black;" | Tackle |
||
| + | |Pokemon 1 Move 2 = Sand-Attack |
||
| − | |colspan="1" align=center style="background:white; color:black; border-right: 2px solid #3c4047;" | Sand-Atttack |
||
| + | |Pokemon 1 Move 3 = Gust |
||
| − | |colspan="1" align=center style="background:white; color:black;" | Thrash |
||
| + | |Pokemon 1 Move 4 = Quick Attack |
||
| − | |colspan="1" align=center style="background:white; color:black;" | -- |
||
| + | |Pokemon 2 Image = [[File:Gyarados-icon.png]] |
||
| − | |- |
||
| + | |Pokemon 2 Name = Gyarados |
||
| − | |colspan="1" align=center style="background:white; color:black;" | Gust |
||
| + | |Pokemon 2 Level = 23 |
||
| − | |colspan="1" align=center style="background:white; color:black; border-right: 2px solid #3c4047;" | Quick Attack |
||
| + | |Pokemon 2 Move 1 = |
||
| − | |colspan="1" align=center style="background:white; color:black;" | -- |
||
| + | |Pokemon 2 Move 2 = Thrash |
||
| − | |colspan="1" align=center style="background:white; color:black;" | -- |
||
| + | |Pokemon 2 Move 3 = |
||
| − | |- |
||
| + | |Pokemon 2 Move 4 = }} |
||
| − | |colspan="2" align=center style="background:#d0d2d7; color:black; border-right: 2px solid #3c4047; border-top: 2px solid #3c4047;" | '''Exeggcute''' |
||
| + | {{Party/Pokemon2 |
||
| − | <small>Lvl 23</small> |
||
| + | |Pokemon 1 Image = [[File:Exeggcute-icon.png]] |
||
| − | |colspan="2" align=center style="background:#d0d2d7; color:black; border-top: 2px solid #3c4047;" | '''Charmeleon''' |
||
| + | |Pokemon 1 Name = Exeggcute |
||
| − | <small>Lvl 25</small> |
||
| + | |Pokemon 1 Level = 20 |
||
| − | |- |
||
| + | |Pokemon 1 Move 1 = Leech Seed |
||
| − | |colspan="1" align=center style="background:white; color:black;" | Leec Seed |
||
| + | |Pokemon 1 Move 2 = Confusion |
||
| − | |colspan="1" align=center style="background:white; color:black; border-right: 2px solid #3c4047;" | Uproar |
||
| + | |Pokemon 1 Move 3 = -- |
||
| − | |colspan="1" align=center style="background:white; color:black;" | Metal Claw |
||
| + | |Pokemon 1 Move 4 = Uproar |
||
| − | |colspan="1" align=center style="background:white; color:black;" | Ember |
||
| + | |Pokemon 2 Image = [[File:Charmeleon-icon.png]] |
||
| − | |- |
||
| + | |Pokemon 2 Name = Charmeleon |
||
| − | |colspan="1" align=center style="background:white; color:black;" | -- |
||
| + | |Pokemon 2 Level = 25 |
||
| − | |colspan="1" align=center style="background:white; color:black; border-right: 2px solid #3c4047;" | Confusion |
||
| + | |Pokemon 2 Move 1 = Metal Claw |
||
| − | |colspan="1" align=center style="background:white; color:black;" | Growl |
||
| + | |Pokemon 2 Move 2 = Ember |
||
| − | |colspan="1" align=center style="background:white; color:black;" | Scratch |
||
| + | |Pokemon 2 Move 3 = Growl |
||
| − | |- |
||
| + | |Pokemon 2 Move 4 = Scratch}} |
||
| − | |colspan="2" align=center style="background:#d0d2d7; color:black; border-right: 2px solid #3c4047; border-top: 2px solid #3c4047;" | Kadabra |
||
| + | {{Party/Pokemon4 |
||
| − | <small>Lvl 20</small> |
||
| + | |Pokemon 1 Image = [[File:Kadabra-icon.png]] |
||
| − | |colspan="2" align=center style="background:#d0d2d7; color:black; border-top: 2px solid #3c4047;" | |
||
| + | |Pokemon 1 Name = Kadabra |
||
| − | |- |
||
| + | |Pokemon 1 Level = 20 |
||
| − | |colspan="1" align=center style="background:white; color:black;" | Disable |
||
| + | |Pokemon 1 Move 1 = Disable |
||
| − | |colspan="1" align=center style="background:white; color:black; border-right: 2px solid #3c4047;" | Confusion |
||
| + | |Pokemon 1 Move 2 = Confusion |
||
| − | |colspan="1" align=center style="background:white; color:black;" | |
||
| + | |Pokemon 1 Move 3 = -- |
||
| − | |colspan="1" align=center style="background:white; color:black;" | |
||
| + | |Pokemon 1 Move 4 = Kinesis}} |
||
| − | |- |
||
| − | |colspan="1" align=center style="background:white; color:black;" | -- |
||
| − | |colspan="1" align=center style="background:white; color:black; border-right: 2px solid #3c4047;" | Kinesis |
||
| − | |colspan="1" align=center style="background:white; color:black;" | |
||
| − | |colspan="1" align=center style="background:white; color:black;" | |
||
|} |
|} |
||
{{-}} |
{{-}} |
||
| Line 257: | Line 200: | ||
==Pokémon Prism== |
==Pokémon Prism== |
||
| + | Botan City reappears in Prism. However, it is quarantined until the player defeats the Rijon League. |
||
==Pokémon Rijon Adventures== |
==Pokémon Rijon Adventures== |
||
| + | |||
| + | == Maps == |
||
| + | {{Maps/Botan_City}} |
||
==Navigation== |
==Navigation== |
||
| Line 265: | Line 212: | ||
[[Category:Cities]] |
[[Category:Cities]] |
||
[[Category:Rijon]] |
[[Category:Rijon]] |
||
| + | [[Category:Recurring locations]] |
||
Revision as of 06:09, 29 June 2020
| |||||||||||||
| |||||||||||||
Connecting locations
| |||||||||||||
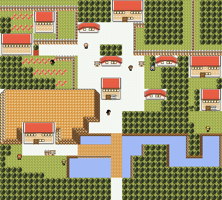
Location 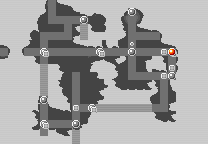 Location of Botan City in Rijon. | |||||||||||||
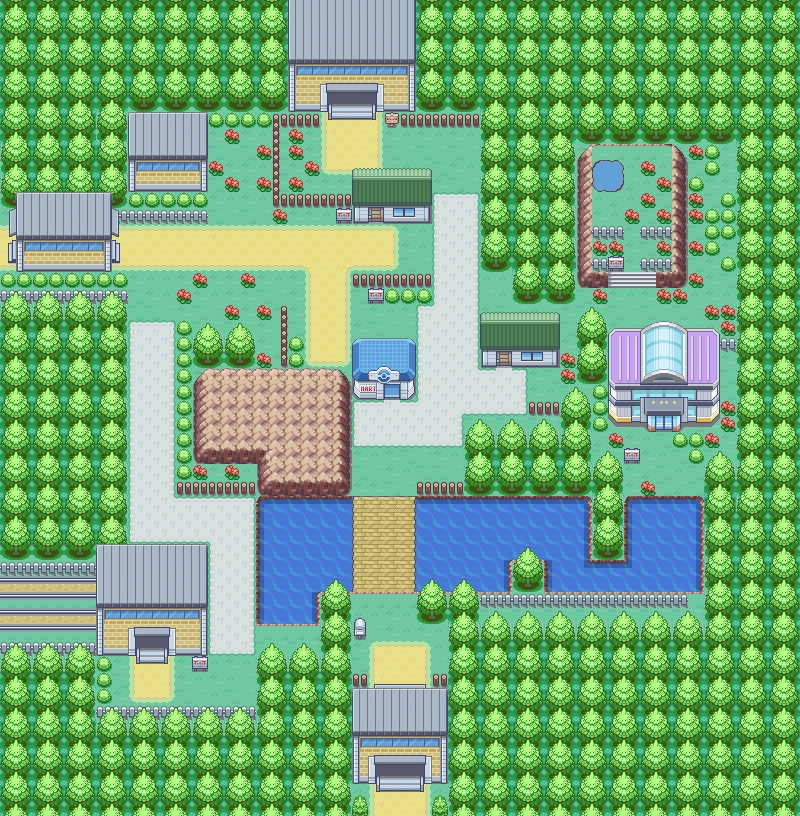
Botan City is a city in the region of Rijon. It doesn't have a Pokémon Center, because its people see Pokémon Centers as unnatural. It has a secret Pokémon Center in Pokemon Prism, however.
Items
| Item | Location | Games | |
|---|---|---|---|
| Lucky Punch | in the house with Chansey inside | RijonAdv | |
| PokéFlute | given by Evelyn | RijonAdv | |
| Mystic Water | nearby the bridge (requires Surf) | RijonAdv | |
| PP Max | given by Joe Reed after saving Carmella | RijonAdv | |
PokéMart
| Rijon Adventures | |||||
|---|---|---|---|---|---|
|
| ||||
|
| ||||
|
| ||||
|
| ||||
|
| ||||
|
| ||||
|
| ||||
|
| ||||
Trainers
![]() If the Player chose Charmander:
If the Player chose Charmander:
| Rival Botan City Reward: |
|||
Pidgeotto Lvl 25 |
Wartortle Lvl 25 | ||
| Tackle | Sand-Attack | Tail Whip | Tackle |
| Gust | Quick Attack | Water Gun | Withdraw |
Kadabra Lvl 20 |
Exeggcute Lvl 20 | ||
| Disable | Confusion | Leech Seed | Confusion |
| -- | Kinesis | Uproar | -- |
Growlithe Lvl 23 | |||
| Ember | Leer | ||
| Odor Sleuth | -- | ||
![]() If the Player chose Squirtle:
If the Player chose Squirtle:
| Rival Botan City Reward: |
|||
Pidgeotto Lvl 25 |
Ivysaur Lvl 25 | ||
| Tackle | Sand-Attack | Sleep Powder | Poison Powder |
| Gust | Quick Attack | Vine Whip | Leech Seed |
Kadabra Lvl 20 |
Growlithe Lvl 23 | ||
| Disable | Confusion | Ember | Leer |
| -- | Kinesis | Odor Sleuth | -- |
Gyarados Lvl 23 | |||
| Thrash | |||
![]() If the Player chose Bulbasaur:
If the Player chose Bulbasaur:
| Rival Botan City Reward: |
|||
Pidgeotto Lvl 25 |
Gyarados Lvl 23 | ||
| Tackle | Sand-Attack | Thrash | |
| Gust | Quick Attack | ||
Exeggcute Lvl 20 |
Charmeleon Lvl 25 | ||
| Leech Seed | Confusion | Metal Claw | Ember |
| -- | Uproar | Growl | Scratch |
Kadabra Lvl 20 | |||
| Disable | Confusion | ||
| -- | Kinesis | ||
Pokémon Brown
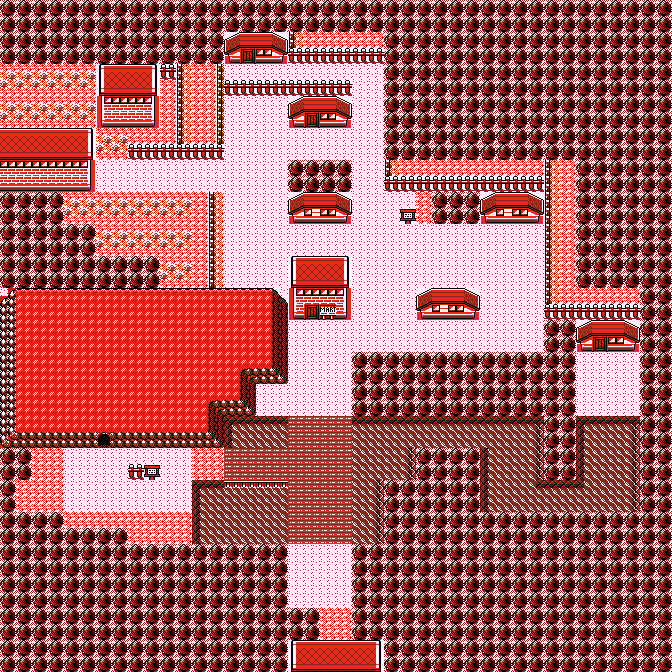
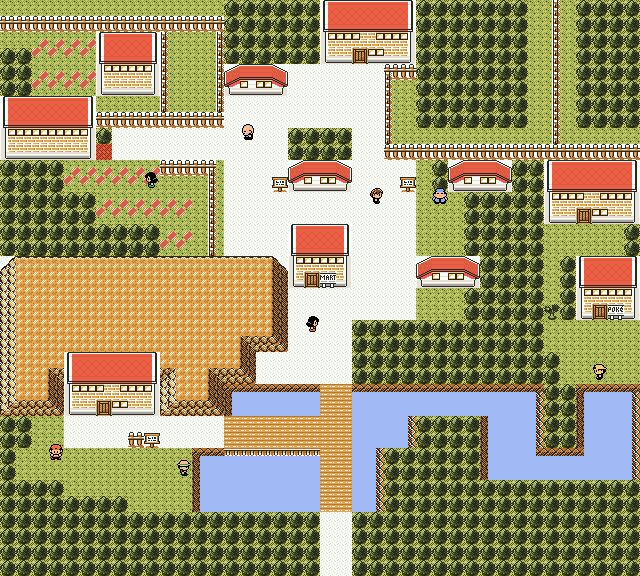
Botan City is a small city on Rijon, located to the east. The city houses the Haunted Forest, and Mr. Rumiko's residence. It can be reached by crossing Route 59.
Haunted Forest
- Main article: Haunted Forest
Mr. Rumiko's house Mr. Rumiko is a nice person, such as Mr. Fuji. His house is full of Pokémon, and he gives the player the Pokéflute after rescuing him on Haunted Forest.
International Tunnel
- Main article: International Tunnel
Pokémon Prism
Botan City reappears in Prism. However, it is quarantined until the player defeats the Rijon League.
Pokémon Rijon Adventures
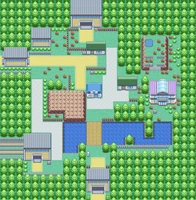
Maps
| Maps (All Games) | ||||
|---|---|---|---|---|
| Brown | Prism | Rijon Adventures | ||

| Rijon | ||||||||
|---|---|---|---|---|---|---|---|---|
|
| ||||||||